I’ve been working on a project that integrates Xamarin with Azure Mobile Apps and uses HockeyApp to distribute the code to test devices. I wanted to add the feature in HockeyApp to allow users to be able to send feedback (including a screenshot) from within the app. On searching for an answer I found a number of good leads but nothing that connected them all so this post is intended to go thru what you need to do to add this feature to your app.
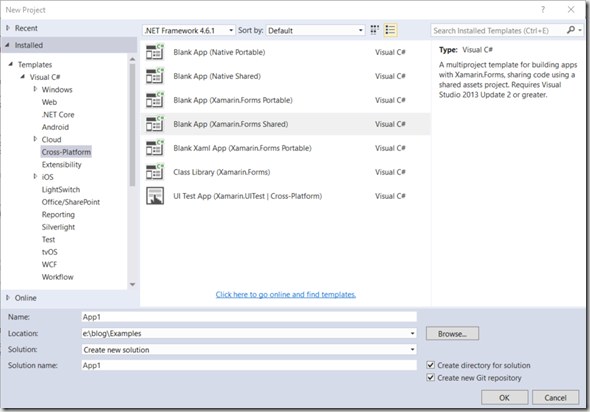
We start with an app that is created from the standard Xamarin Forms template in Visual Studio for cross-platform apps (this assumes you have Visual Studio 2015.3 with the Xamarin tools installed otherwise it will prompt you to add them).

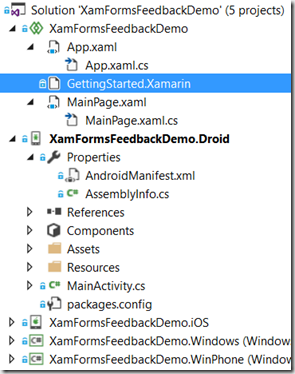
The solution will look like this. Note I had to do a little work to use the Shared version of Xamarin forms with XAML in that I replaced the default App.cs file it includes with XAML versions of that and the MainPage.xaml. You can see the completed demo sample on GitHub here

To add HockeyApp’s feedback feature to our solution go to https://www.hockeyapp.net/ and sign up to create a new app. After an app has been created you can get the HockeyApp ID and use it in the MainActivity.cs code for the OnCreate() method when the application registers with HockeyApp. The process is fairly straight forward:
- Create a new app on HockeyApp (https://support.hockeyapp.net/kb/app-management-2/how-to-create-a-new-app)
- Add the HockeyApp component from Xamarin (https://components.xamarin.com/view/hockeyappandroid)
![SNAGHTML4b9e527[4] SNAGHTML4b9e527[4]](/image.axd?picture=SNAGHTML4b9e527[4]_thumb.png)
- In the MainActivity.cs file of the Android project add a function to register HockeyApp with the AppID you created. We will call it from the OnCreate().
-
private void InitializeHockeyApp()
{
CrashManager.Register(this, HOCKEYAPP_APPID, new MyCrashManagerListener());
UpdateManager.Register(this, HOCKEYAPP_APPID);
FeedbackManager.Register(this, HOCKEYAPP_APPID);
Tracking.StartUsage(this);
}
- Add a method to handle the feedback calls in the MainActivity class. In this implementation I’m also capturing a screenshot that can be added to the feedback process if the user chooses.
-
public void HandleFeedback()
{
FeedbackManager.SetActivityForScreenshot(MainActivity.current);
FeedbackManager.TakeScreenshot(MainActivity.current);
FeedbackManager.ShowFeedbackActivity(MainActivity.current);
}
- Implement an ISensorEventListener class to handle shake activity. Note that you need to implement both the Java.Lang.Object interface as well as the ISensorEventListener. I added an overloaded constructor to allow me to pass a reference to the MainActivity instance (parent) that uses this to handle sensor activity. We will also handle the
-
// --- Implement ISensorEventListener
public class MyShakeHandler : Java.Lang.Object, ISensorEventListener
{
// --- Reference to parent activity
private MainActivity parent;
// Handle Shake from - http://stackoverflow.com/questions/23120186/can-xamarin-handle-shake-accelerometer-on-android
bool hasUpdated = false;
DateTime lastUpdate;
float last_x = 0.0f;
float last_y = 0.0f;
float last_z = 0.0f;
const int ShakeDetectionTimeLapse = 250;
const double ShakeThreshold = 800;
// --- In constructor set parent
public MyShakeHandler(Activity context) : base()
{
parent = (MainActivity)context;
}
public void OnAccuracyChanged(Android.Hardware.Sensor sensor, Android.Hardware.SensorStatus accuracy)
{
}
public void OnSensorChanged(Android.Hardware.SensorEvent e)
{
if (e.Sensor.Type == Android.Hardware.SensorType.Accelerometer)
{
float x = e.Values[0];
float y = e.Values[1];
float z = e.Values[2];
DateTime curTime = System.DateTime.Now;
if (hasUpdated == false)
{
hasUpdated = true;
lastUpdate = curTime;
last_x = x;
last_y = y;
last_z = z;
}
else
{
if ((curTime - lastUpdate).TotalMilliseconds > ShakeDetectionTimeLapse)
{
float diffTime = (float)(curTime - lastUpdate).TotalMilliseconds;
lastUpdate = curTime;
float total = x + y + z - last_x - last_y - last_z;
float speed = Math.Abs(total) / diffTime * 10000;
if (speed > ShakeThreshold)
{
// --- Call parent's Feedback handler
parent.HandleFeedback();
}
last_x = x;
last_y = y;
last_z = z;
}
}
}
}
}
- In the MainActivity.cs OnCreate() function add code to add an accelerometer sensor recognition. Note that you also have to add usings for Android.Hardware and for HockeyApp.Android. The code for OnCreate() will look like this:
-
// --- Add Globals
public static string HOCKEYAPP_APPID = "<HOCKEYAPP ID>";
public static Android.App.Activity current;
protected override void OnCreate (Bundle bundle)
{
base.OnCreate (bundle);
// --- Register this as a listener with the underlying service.
var sensorManager = GetSystemService(SensorService) as Android.Hardware.SensorManager;
var sensor = sensorManager.GetDefaultSensor(Android.Hardware.SensorType.Accelerometer);
current = this;
sensorManager.RegisterListener(new MyShakeHandler(current), sensor, Android.Hardware.SensorDelay.Normal);
InitializeHockeyApp();
global::Xamarin.Forms.Forms.Init (this, bundle);
LoadApplication(new App());
}
- In the AndroidManifest.xml add permissions to the sensors
-
<?xml version="1.0" encoding="utf-8"?>
<manifest xmlns:android="http://schemas.android.com/apk/res/android">
<uses-sdk android:minSdkVersion="15" />
<uses-permission android:name="android.permission.ACCESS_COARSE_LOCATION" />
<uses-permission android:name="android.permission.ACCESS_FINE_LOCATION" />
<uses-permission android:name="android.permission.ACCESS_MOCK_LOCATION" />
<uses-permission android:name="android.permission.INTERNET" />
<uses-permission android:name="android.permission.ACCESS_NETWORK_STATE" />
<uses-feature android:name="android.hardware.sensor.accelerometer" android:required="true" />
<application android:label="xForms-FeedbackDemo"></application>
</manifest>
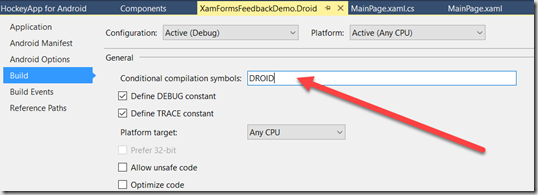
- In my scenario I also wanted a button on an about page that can be used to trigger the feedback logic from XAML. To make it work with a Shared code project in Xamarin Forms, I defined a DROID compilation definition so I can conditionally work with Android specific code

- In the XAML page you want to add a feedback button connect to the MainActivity’s logic.
-
using System;
using Xamarin.Forms;
#if DROID
using HockeyApp.Android;
using XamFormsFeedbackDemo.Droid;
#endif
namespace XamFormsFeedbackDemo
{
public partial class MainPage : ContentPage
{
public MainPage ()
{
InitializeComponent ();
}
public void btnFeedback(object sender, EventArgs e)
{
#if DROID
FeedbackManager.SetActivityForScreenshot(MainActivity.current);
FeedbackManager.TakeScreenshot(MainActivity.current);
FeedbackManager.ShowFeedbackActivity(MainActivity.current);
#endif
}
}
}
You can download the code from GitHub here.
Happy Coding!